fbpx

How To Use Elementor: A Complete Guide For Beginners

How To Use Elementor

Have you always wanted to design beautiful websites but felt intimidated by the idea of messing with codes? Or perhaps you need a website for your business, and you are looking for a good alternative to hiring professional website designers. 

Whatever your reasons maybe, if you have the page builder Elementor, you can create stunning websites all on your own without any coding. In this blog post, we’re going to give you a complete guide on how to use Elementor to create amazing websites in a matter of minutes.

Table of Contents

Elementor For WordPress: The Easiest Way To Design Websites Without Coding

Elementor is the ultimate, easiest, all-in-one solution for anyone who wants to quickly design websites without the hassle of editing any codes. It is the most popular page builder for WordPress, because it comes with an easy-to-use ‘drag and drop’ feature. All you have to do is click on any ‘element’ you like and drag it to any part of your page to create your design.

This page builder is immensely popular because it empowers people without any technical background to design websites that look as beautiful as those made by professionals. Not only does Elementor come with a collection of useful widgets (also called ‘elements’) but it also gives you full freedom over how you want to customize your website.

What Makes Elementor The Most Popular Page Builder?

With the help of Elementor, people all over the world are creating their own stunning websites within minutes. You can build all kinds of websites with this page builder–from restaurant business pages, to construction service websites, personal blogs and much more.

Take a look at all these websites below that were made using Elementor. As you can see, the design possibilities with Elementor are endless.

Differences Between Elementor Free vs Elementor Pro

Elementor comes in two versions–a free version and a premium version known as Elementor Pro. While you can create beautiful landing pages with just the free version of Elementor, the premium version gives you more flexibility to design fully functional websites.

Let’s take a quick look at all the features you can get with both the free version of Elementor and with Elementor Pro.

Features Of Free Version

Features Of Elementor Pro

  • 30 Widgets

  • 15+ Premade Blocks & Templates

  • Forum Support

  • 50+ Widgets & 300+ Templates

  • Popup & Theme Builders

  • 15+ Integrations With Popular Platforms

Enhance Your Elementor Experience With Essential Addons

As you can see, there are tons of things you can do with Elementor. However, if you really want to take your design skills to the next level, then you must try Essential Addons For Elementor, the most popular elements library for Elementor.

Essential Addons gives you more than 70 beautiful, useful elements that completely enhances your website designing experience with Elementor. From creating stunning, interactive forms, to presenting your content creatively with attractive flip boxes, image accordions, advanced data tables, there is a lot you can do with Essential Addons.

This one of the main reasons why Essential Addons is the most popular elements library for Elementor, with over 600,000 active users. With Essential Addons, you get to unlock your creativity when it comes to designing stunning websites without touching a single line of code.

How To Use Elementor To Create Amazing Websites Without Coding

In this section, we’re going to give you a step-by-step walkthrough on how to use Elementor to design beautiful websites instantly without coding. Just follow these easy instructions and you are ready to get started with Elementor.

You need to have your own domain on WordPress to do this. If you don’t have your own domain and are currently using a site on WordPress.com, then check out our ultimate guide to move your blog from WordPress.com to WordPress.org to start using Elementor.

Step 1: Install & Activate Elementor For WordPress

The first step is to install and activate Elementor from the WordPress repository by searching for ‘Elementor’ in the search box. Once you have the plugin, just click on ‘Install Now’ and then ‘Activate’ to get started.

How To Use Elementor: A Complete Guide For Beginners 1

Step 2: Create A New Page With Elementor

Once you have installed Elementor, you need to navigate to your WordPress dashboard and click on Pages→ Add New to create your website’s first landing page. At the very top of your new page you will see a blue button named ‘Edit With Elementor’. When you click this button, you will be redirected to the Elementor Editor.

How To Use Elementor

Step 3: Build Your Page With Elementor Editor

If you have successfully completed the above steps, then you should see the Elementor Editor on your left hand side. From here you can start designing your page by dragging and dropping any widgets you like anywhere on your page. You can even add new sections to your page to add different elements in different areas of your page.

How To Use Elementor

How To Use Elementor To Manually Design Your Page Structure

With the Elementor Editor, you have the flexibility to customize the entire layout, structure and appearance of your website pages. All you have to do is adjust a few settings in the Elementor Editor and watch the changes in real time. 

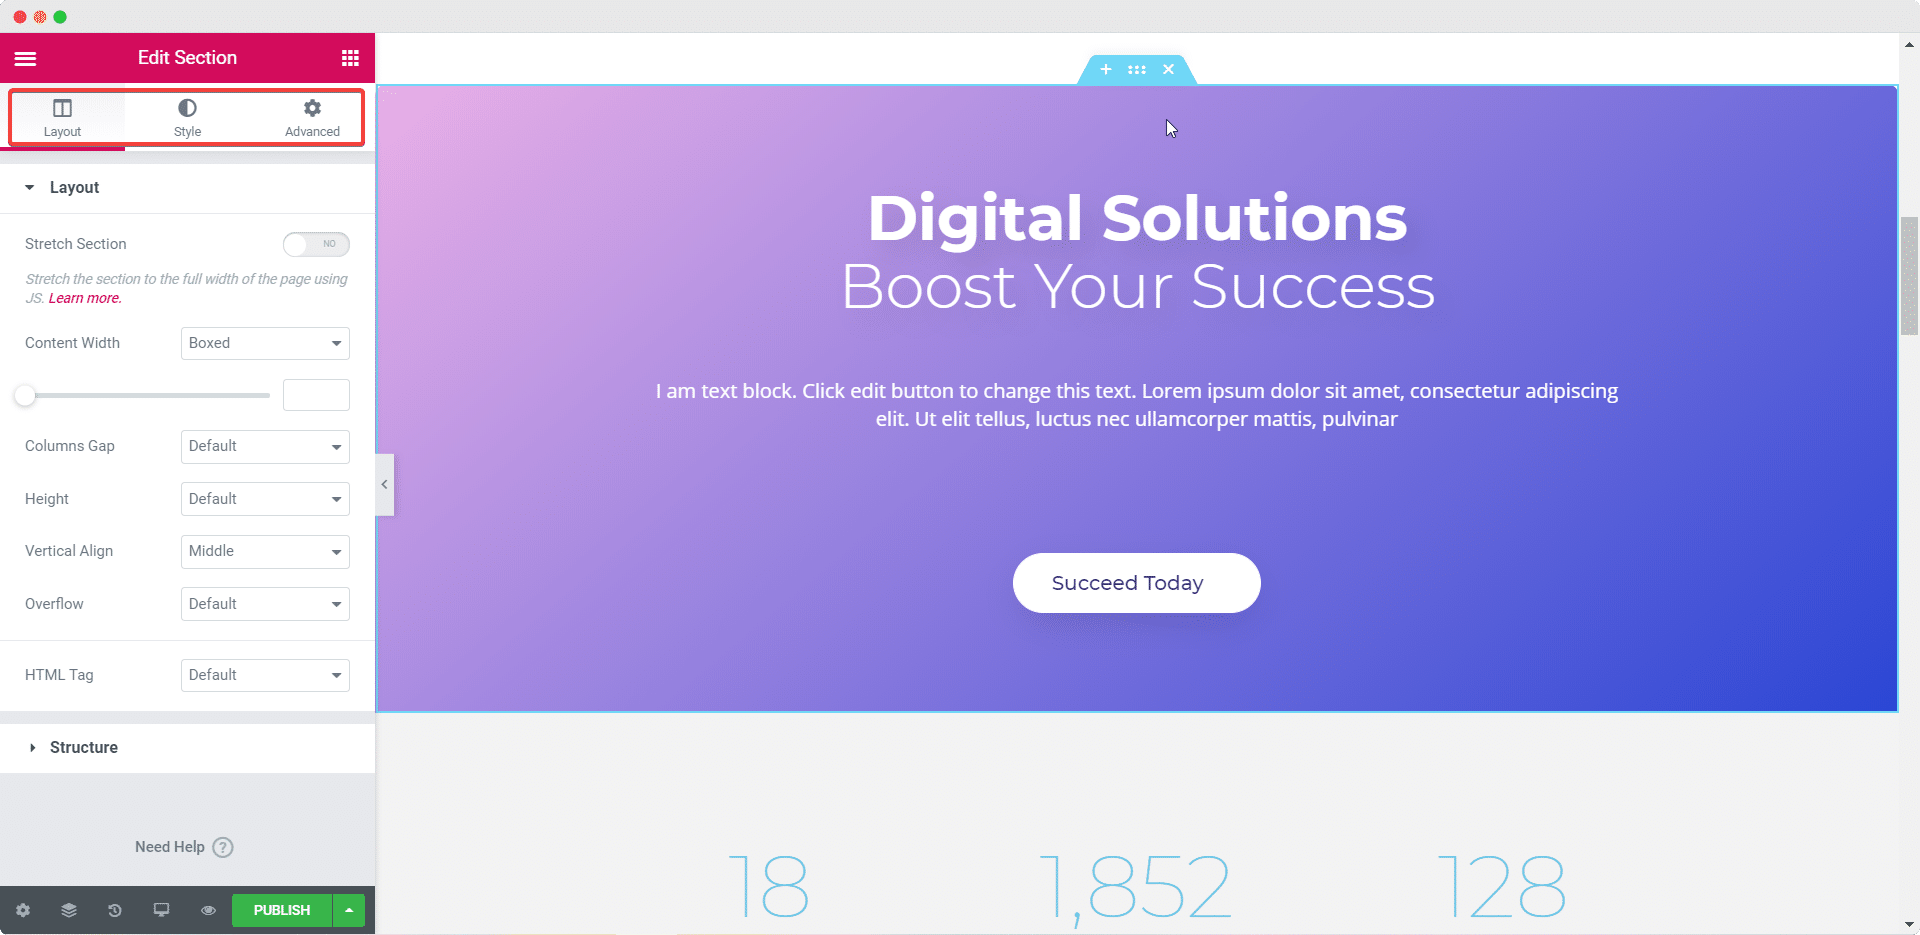
Step 1: Choose Your Page Layout In Elementor Editor

You can select the layout of your page from the Elementor Editor by clicking on the gear icon and then selecting any of the layout options from the ‘Page Layout’ drop down menu. For this tutorial, we are using the ‘Elementor Full Width’ layout.

How To Use Elementor

You can also choose to toggle the ‘Hide Title’ option from here if you don’t want to display your page title. If you want to change the background color of your page, or add a background image to your page, you can click on the ‘Style’ tab and play around with the settings under ‘Body Style’

How To Use Elementor

Step 2: Choose Layout Structure For Each Section

By clicking on the ‘+’ icon above the ‘Drag widget here’ option you can choose the layout structure for each individual section. This is especially useful if you want to add a lot of different elements together in one section, and gives you more flexibility when it comes to designing your web page.

How To Use Elementor

Step 3: Add Elements & Move Different Sections

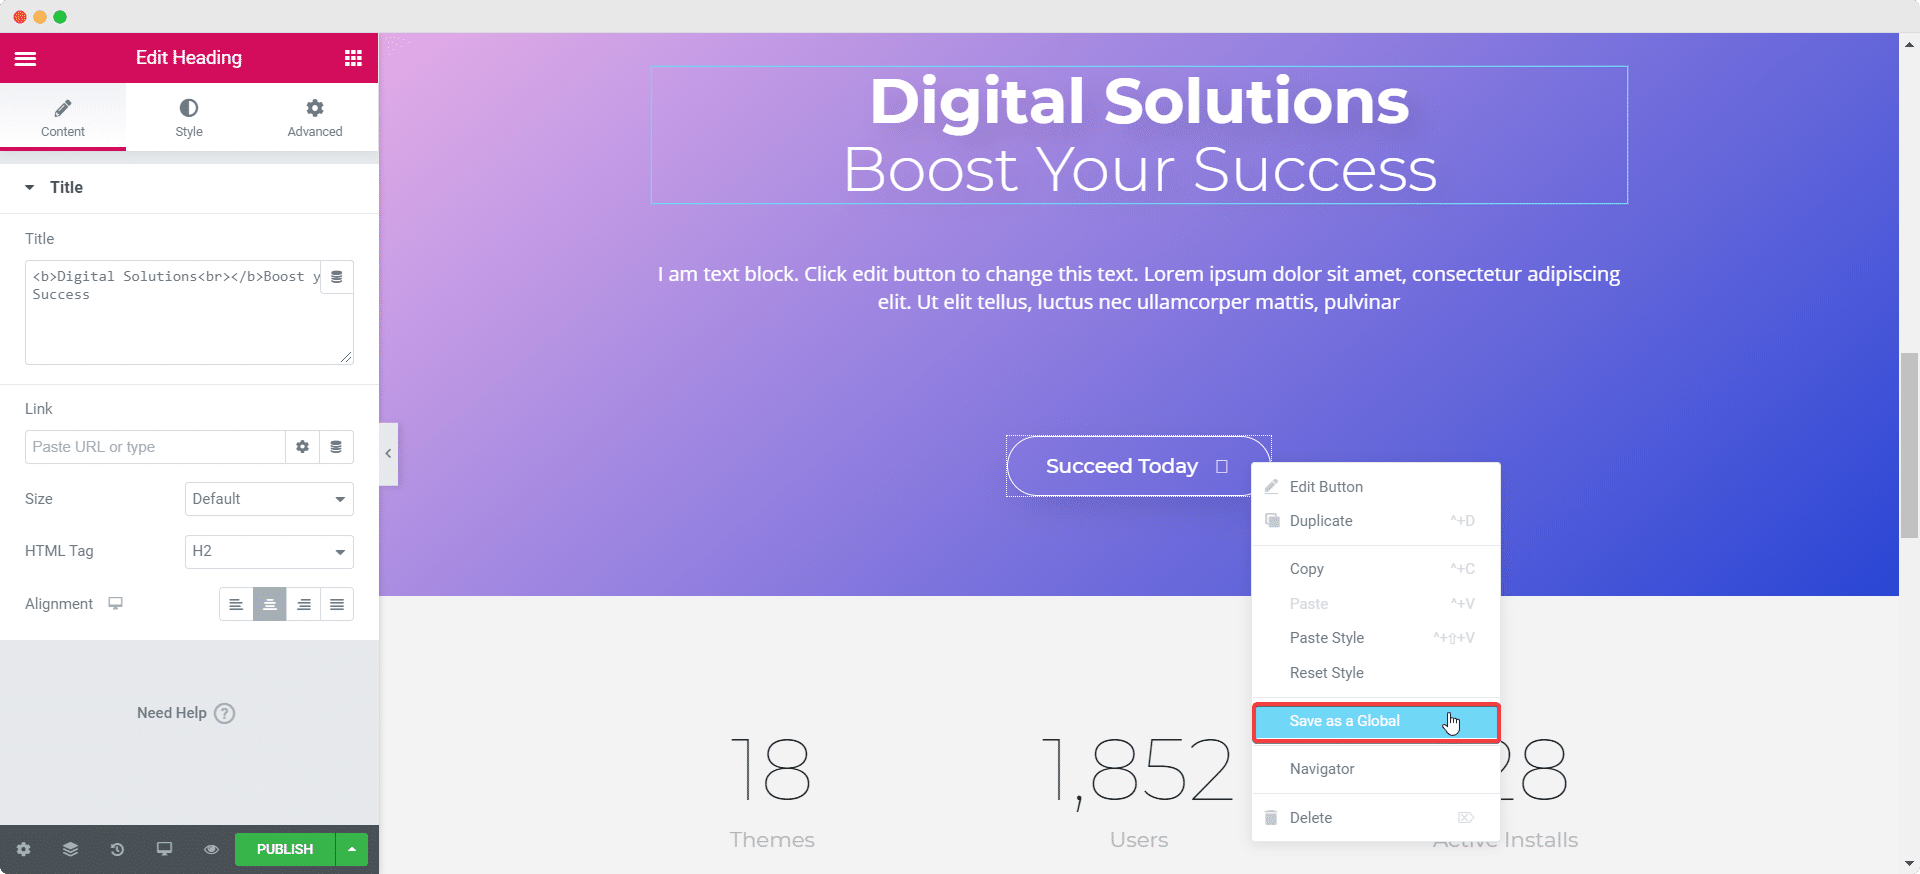
Keep adding elements and moving sections until you are happy with the way your page looks. For each element you’ll see three tabs–Layout, Style and Advanced. For every element, the settings under these tabs will be different, so play around with the options until you are satisfied with the appearance of your page.

How To Use Elementor: A Complete Guide For Beginners 2

Step 4: Set & Display Global Widgets On All Pages

With Elementor Pro, you get the option to set and display global widgets. These widgets will be automatically displayed on every page of your website. This is very useful for elements that need to be repeated on each page, such as a Menu bar, buttons, opt-ins and much more.

To save any element as a global widget, all you have to do is right click on the element and select ‘Save As Global’.

How To Use Elementor: A Complete Guide For Beginners 3

How To Use Ready, Premade Elementor Templates

Elementor comes with tons of free, premade templates that you can use to instantly create your website. On any section of your page, click on the Add Template From Library icon.

How To Use Elementor

You will be prompted to connect your account with Elementor, after which you can insert any of the premade templates available on Elementor Library directly into your site.

How To Use Elementor: A Complete Guide For Beginners 4

Once your preferred template is inserted into your site, all you have to do is customize it to suit your style. If you want to know more, you can check out our tutorial on how to create a WordPress landing page using Elementor for a more detailed guide. 

To get even more beautifully designed premade, ready-to-use Elementor templates, check out Templately, the ultimate templates cloud for WordPress. 

Templately gives you a huge collection of stunning ready-made Elementor templates which you can use to instantly create websites. You can get premade page template designs for all kinds of purposes, and even get access to template packs to create a fully functional website in less than 5 minutes. 

How To Use Elementor

In addition to this, Templately also provides cloud storage known as MyCloud where you can save all of your favorite designs and reuse them anytime, from anywhere.

You can also share your designs with your team with the Templately WorkSpace feature, which enables cloud collaboration. 

How To Use Elementor

You can sign up for a free account on Templately to access tons of beautiful Elementor templates and get cloud storage to save all your designs in one place.

How To Use Elementor Popup Builder & Create Stunning Popups

You can create amazing popup notifications to compel your site visitors to action using the Elementor Popup Builder. Follow these steps to find out how you can create stunning popups within minutes in Elementor with touching a line of code.

Step 1: Create A New Popup Using Elementor Popup Builder

Navigate to Templates–> Popup from your WordPress dashboard and click on the ‘Add New Popup’ button. Give a name for your new popup and click on ‘Create Template’ as shown below.

How To Use Elementor

Step 2: Customize Your Popup In Elementor

You can choose to design your pop-up from scratch, or choose any of the premade templates for popups too. Pick any of the designs you like and then customize your popup however you want.

How To Use Elementor

Step 3: Select The Conditions For Your Popup

After you are done customizing our popup, click on publish. You will be prompted to configure the settings for displaying your popup. With Elementor, you can choose which pages your popup will be displayed, on what conditions they should be displayed and much more. Select the right options that are best for you and your popups are ready to go.

How To Use Elementor

When you are done, you should be able to see your popup displayed beautifully like the one shown below. 

How To Use Elementor: A Complete Guide For Beginners 5

Just like that, you can create stunning popups for your website using Elementor. 

How To Use Elementor Theme Builder

You can use the Elementor Theme Builder to quickly design essential features of your website such as Header & Footer, different sections and pages and much more. In this section, we’re going to show you how you can build beautiful headers with Elementor Theme builder.

Step 1: Create A New Header In Elementor

First navigate to Templates–> Theme Builder from your WordPress dashboard. Click on ‘Add New’. Afterwards, you have to select Header as your Template Type and give it a name.

How To Use Elementor

Step 2: Customize Your Header In Elementor

You can choose to design your own header or you can pick any of the premade ones from Elementor Template Library. After choosing a design that you like customize it however you want to create your own stunning Header.

How To Use Elementor

After customizing your header and licking ‘Publish’, if you want you can set conditions for where you want your header to be displayed.

When you are done you should be able to see your header displayed on your page.

How To Use Elementor

You can follow these same steps to create footers for you website too. Just make sure to choose ‘Footer’ as your Template Type when you are designing your footer using the Elementor Theme Builder.

How To Use Elementor To Create Beautiful, Interactive Forms

You can create beautiful, interactive forms with Elementor on your website. Whether you need to create contact forms, or forms for a newsletter or an events registration, you can create eye-catching forms on your website with Elementor. 

You can use the ‘Form’ element which comes with Elementor Pro.  All you have to do is drag and drop the element anywhere on your page, and then customize it with your own content and style.

How To Use Elementor

However, for a more creative, interactive and beautiful design however, you can use the form styler elements that are available with the free version of Essential Addons. With just the free version of Essential Addons you can add up to 9 different types of forms, which include:

  • Contact Form 7
  • weForms
  • Ninja Form
  • Gravity Form
  • Caledra Form
  • WPForms
  • FluentForm 
  • Formstack
  • Typeform

To give you an idea, take a look at this stunning form that you can make in Elementor using Essential Addons.

How To Use Elementor: A Complete Guide For Beginners 6

How To Create Stunning Documentation With Elementor

You can create a stunning knowledge base or documentation with Elementor by using BetterDocs–the most powerful and popular knowledge base solution for WordPress.

A documentation page or knowledge base helps your site visitors know more about you and your products, how to troubleshoot problems by themselves, and essentially reduce your support tickets. With BetterDocs installed, you can create an amazing WordPress documentation page with Elementor.

How To Use Elementor

How To Use Elementor To Set Up Your WooCommerce Store

If you’re looking to start your online business, then WooCommerce is a popular platform that you can use. Elementor offers seamless integration with WooCommerce, and lets you add advanced design and functionality to your WooCommerce store. Follow these simple steps to set up your WooCommerce store using Elementor.

Even though Elementor WooCommerce Builder itself is quite powerful, you can make your WooCommerce website truly come to life with Essential Addons For Elementor. With the help of Essential Addons, you can display your Woo Product Collections in a stunning way, or showcase your products with a beautiful grid layout and even create WooCommerce Checkout Page in Elementor.

Step 1: Display Your Products With Woo Product Collections

When you are done setting up your WooCommerce Store, create a new page in Elementor Editor and display your products with EA Woo Product Collections element. Simply search for ‘Woo Product Collections’ in the search bar under ELEMENTS from the Elementor Editor and drag and drop this element on any page you like. Afterwards, configure the content and customize however you want to. For more details, read this documentation here.

How To Use Elementor

You can also display your products in a beautiful grid layout using the EA Woo Product Grid element.

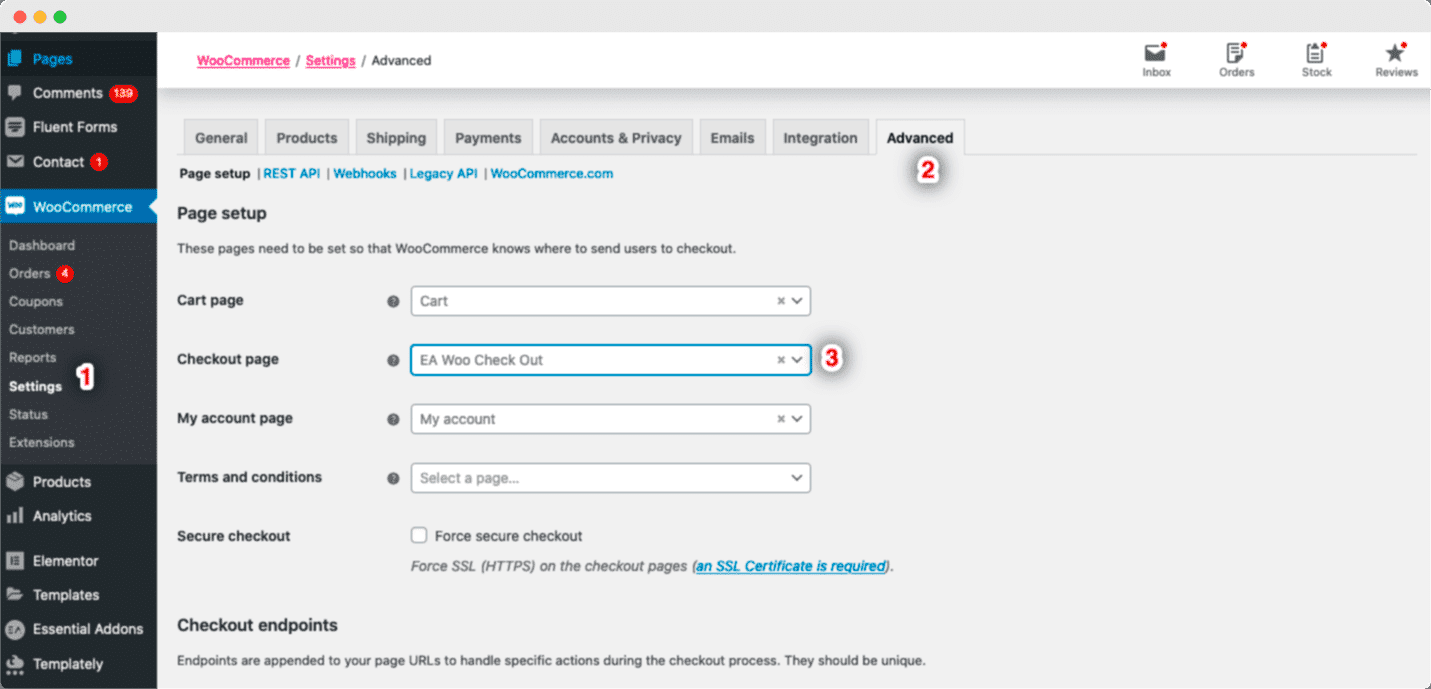
Step 2: Create A Woo Checkout Page For Your WooCommerce Store

Next you need to assign a new page as your Woo Checkout Page. Navigate to WooCommerce ->Settings from your WordPress Dashboard and click on the ‘Advanced’ tab. From here, you can assign your desired page as your Checkout page. Simply click on the Checkout page option and pick any of the pages from the drop-down menu as your WooCommerce Checkout page. 

How To Use Elementor: A Complete Guide For Beginners 7

Once you have assigned a page, edit that page with the Elementor Editor and find the ‘EA Woo Checkout’ element from the ‘Search’ option under the ‘ELEMENTS’ tab. Simply just Drag & Drop the ‘Woo Checkout’ element into the ‘Drag widget here‘ or the ‘+’ section. Configure the settings and customize until you are happy with your Woo checkout page. For further details, read this documentation.

How To Use Elementor

Wrapping Up

That brings us near the end of our guide to use Elementor. We hope you find this tutorial useful, and would love to hear your feedback in the comments section. 

For more tutorials, guides, news and updates, subscribe to our blog or join our Facebook community to connect with other website designers and content creators.

Tanaz

Tanaz

Tanaz is a content creator who has a passion for writing--be it for tech products, book reviews, or film recommendations. She has a Bachelor's degree in Business Administration with a major in Marketing. Her hobbies include blogging, reading, and obsessing over all things Disney

Share This Story