SchedulePress gives you the opportunity to automatically share scheduled WordPress posts on your Facebook page and group. By connecting Facebook with SchedulePress, your posts will automatically be shared on your Facebook account at the scheduled time. Besides, with its ‘Instant Share’ flexibility, you can share your post anytime you want on Facebook as well.
Moreover, you can now simultaneously share your posts on ‘multiple Facebook accounts’ by using SchedulePress Pro as well. This feature would come in very handy if you want to grow your social media presence and give your brand some much-needed exposure. Follow the below guidelines to share scheduled posts of WordPress on your Facebook profile:
Step 1: Connect Facebook with SchedulePress #
Before you begin, make sure that you already have created a Facebook Page on your Account. Go to your WordPress Dashboard and navigate to ‘wp-admin’ → ‘SchedulePress’ → ‘Settings.’ Then, simply open up the ‘Social Profile’ tab and switch to the ‘Facebook’ option. Make sure that the ‘Facebook’ option is enabled.

After hitting the ‘Add New Profile’ button, it will ask you to add your Facebook ‘App ID’ and ‘App Secret’ on the popup window. If you already have a Facebook developer account, you just have to copy and paste it in this required place. Unless you have to first create your app by following the process below.

Step 2: Use Your Own Facebook App #
To use this method, you need to make sure that you have created your own App. If you don’t have it, you can simply get started by logging into your Facebook Developer Account.
Create an App #
From the top menu, you will find ‘My Apps’, click on it & head over to the ‘Create App’ option from the right corner. Now, hit the option.

Next, you need to select any kind of app from the options. For now, we will be choosing Other → Business & click on ‘Next.’

You can simply set your Display Name and Contact Email. Then click on ‘Create App’.

You will then be redirected to the App Dashboard. This would look something like this:

Setup Facebook Login for Business #
From the dashboard, click on ‘Set up’ under ‘Facebook Login for Business’ & you’ll be redirected to the below page.

Insert Valid OAuth Redirect URIs #
Afterward, you have to go to the Facebook Login ‘Settings’ option to add the ‘Valid OAuth Redirect URIs’. You will get it from the ‘Redirect URI’ section that was in the ‘Add New Profile’ window of SchedulePress.

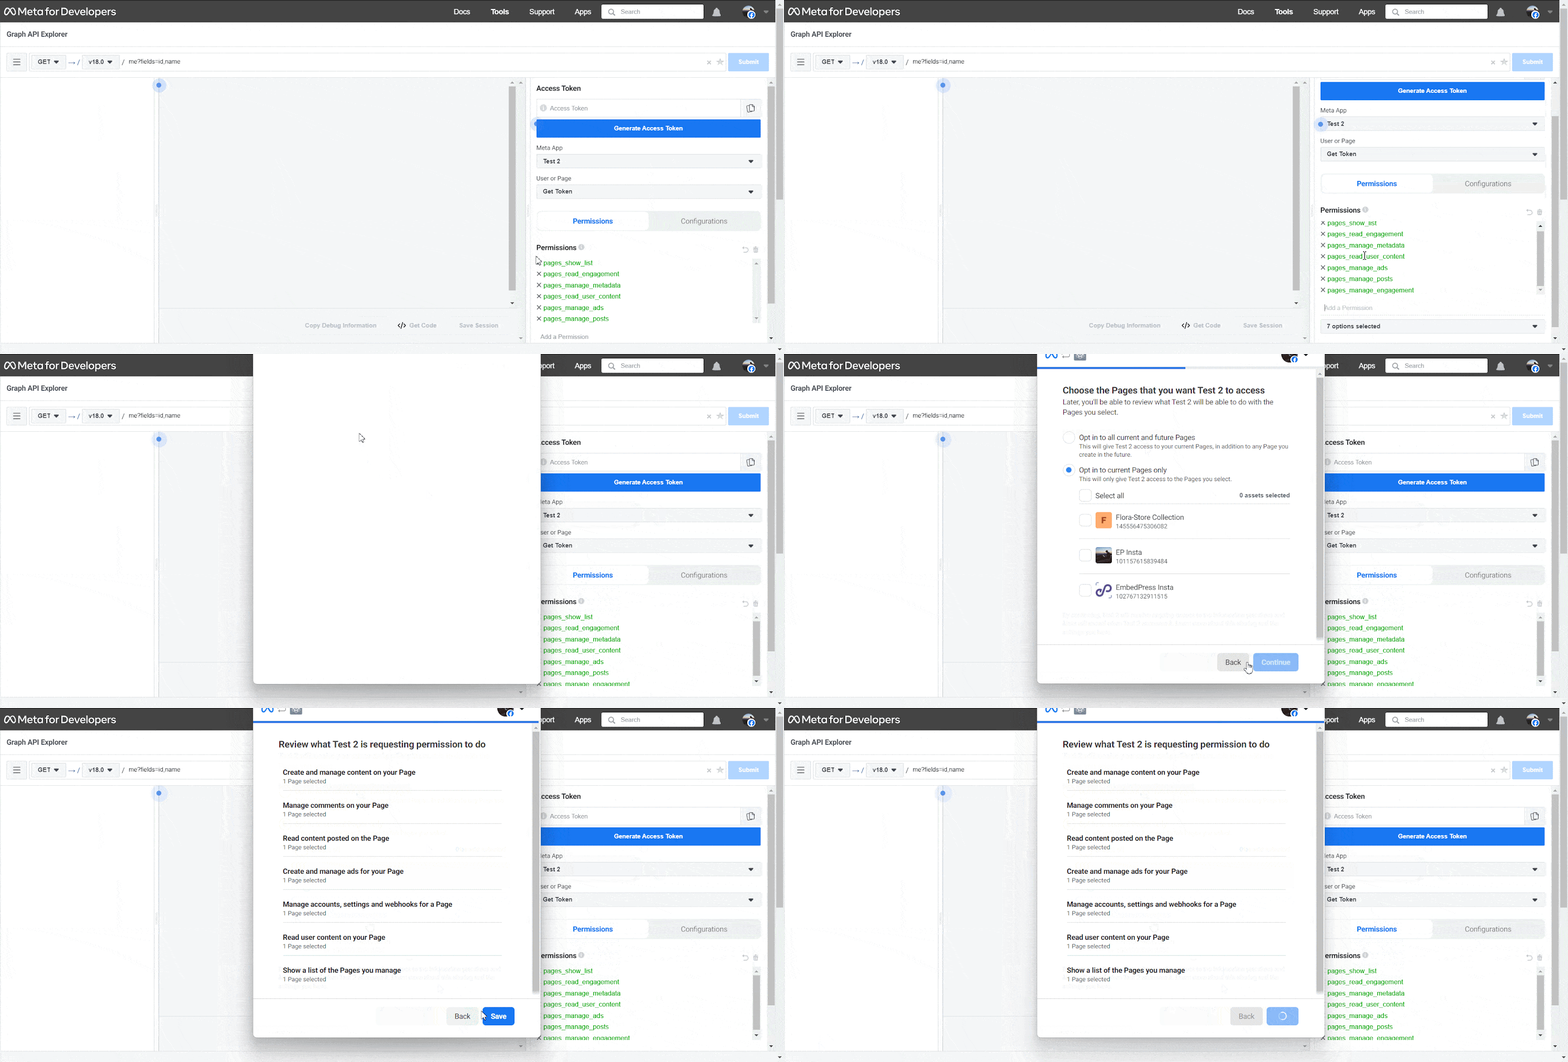
Next, you need to navigate to Tools → Graph API Explorer to set the ‘Permission and Features’ option.

Search the features below & click on the App Review Request to complete the integration process.
pages_show_list
business_management
pages_read_engagement
pages_manage_metadata
pages_read_user_content
pages_manage_ads
pages_manage_posts
Pages_manage_engagement
Generate Access Token #
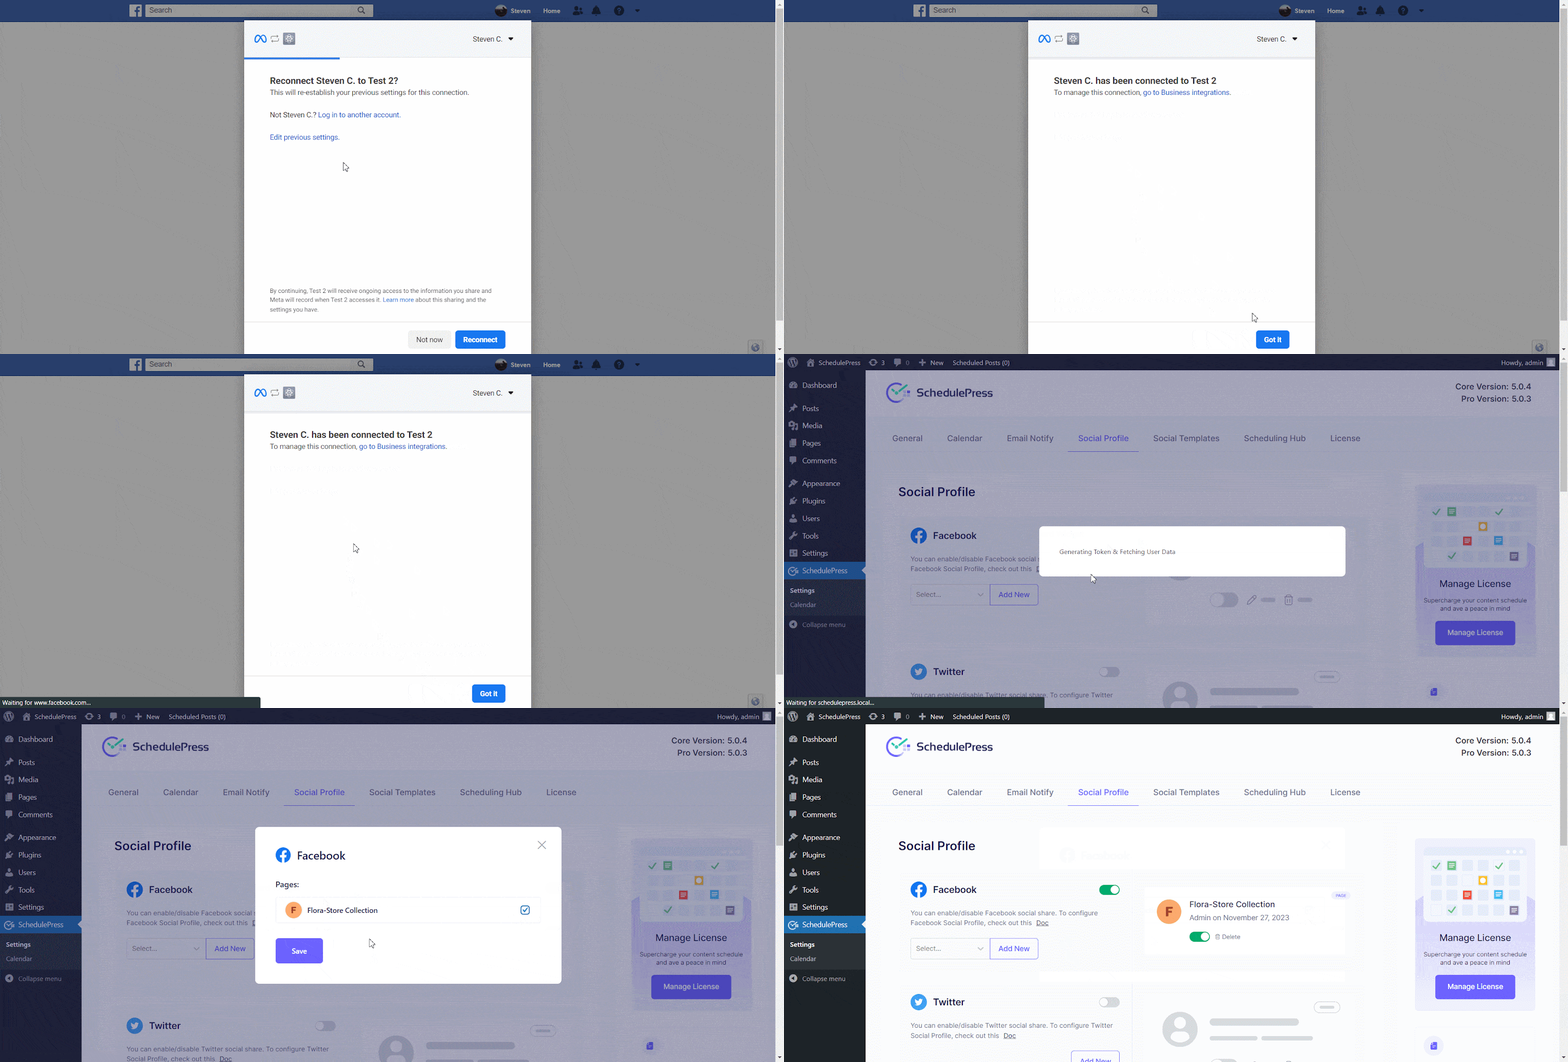
After you have done so, click on the ‘Generate Access Key’ button to retrieve your Access token. You will be asked to continue as a user. Allow permissions to the page you have created. Afterward, go ahead and allow the permissions for the App you have created and hit the ‘Save’ button.

Retrieve Facebook API Keys #
You will find the App ID & App Secret Keys from your Dashboard → App Settings → Basic. Simply just copy the App ID & App Secret Key from here. Make sure to add a site URL in the ‘App Domains’ field and then click on the ‘Save Changes’ button.

Make sure you paste your retrieved ID and secret keys in the right places like this.

Step 3: Connect Your Facebook Page with SchedulePress #

Afterward, SchedulePress will be successfully connected to your Facebook page. By simply following the previous steps, you can add a new profile and connect multiple Facebook pages with SchedulePress as well.
Step 4- Connect Your Facebook Group with SchedulePress #
Connecting Facebook groups with SchedulePress is almost similar to connecting Facebook pages except few changes. Let’s dive in.
To use this method, you need to make sure that you have created your own App. If you don’t have it, you can simply get started by logging into your Facebook Developer Account.
Create an App #
From the top menu, you will find ‘My Apps’, click on it & head over to the ‘Create App’ option from the right corner. Now, hit the option.

Next, you need to select any kind of app from the options. For now, we will be choosing Other → Business & click on ‘Next.’

You can simply set your Display Name and Contact Email. Then click on ‘Create App’.

You will then be redirected to the App Dashboard. This would look something like this:

Setup Facebook Login for Business #
From the dashboard, click on ‘Set up’ under ‘Facebook Login for Business’ & you’ll be redirected to the below page.

If you’ve followed this far, you’ll see a page as shown below from where you need to switch to ‘Facebook Login’ to get the ‘publish_to_groups’ & ‘public_profile’ permissions since these are not available with ‘Facebook Login for Business.’

Insert Valid OAuth Redirect URIs #
Afterward, you have to go to the Facebook Login ‘Settings’ option to add the ‘Valid OAuth Redirect URIs’. You will get it from the ‘Redirect URI’ section that was in the ‘Add New Profile’ window of SchedulePress.

Next, you need to navigate to Tools → Graph API Explorer to set the ‘Permission and Features’ option.

Now you’ll get all the below permissions automatically. If not, search the features below & click on the App Review Request to complete the integration process.
pages_show_list
business_management
publish_to_groups
pages_read_engagement
pages_manage_metadata
pages_read_user_content
pages_manage_ads
pages_manage_posts
pages_manage_engagement
public_profile
Generate Access Token #
After you have done so, click on the ‘Generate Access Key’ button to retrieve your Access token. You will be asked to continue as a user. Allow permissions to the page you have created. Afterward, go ahead and allow the permissions for the App you have created and hit the ‘Save’ button.

Retrieve Facebook API Keys #
You will find the App ID & App Secret Keys from your Dashboard → App Settings → Basic. Simply just copy the App ID & App Secret Key from here. Make sure to add a site URL in the ‘App Domains’ field and then click on the ‘Save Changes’ button.

Make sure you paste your retrieved ID and secret keys in the right places like this.

Now, let’s connect your Facebook group with SchedulePress.

Afterward, SchedulePress will be successfully connected to your Facebook group. By simply following the previous steps, you can add a new profile and connect multiple Facebook groups with SchedulePress as well.
Step 5- Schedule Blog Post & Automatically Share It on Facebook #
If you schedule your WordPress post, it will automatically be shared on the Facebook account. Besides, if you want, you can even instantly share your live post on Facebook as well. To do that, go to your post and navigate to ‘Social Share Settings’ and choose ‘Facebook’ social share platform. Simply hit the ‘Share Now’ button and your post will instantly be shared on your Facebook page or group. If you want, you can even upload a custom ‘Social Share Banner’ for your Facebook post as well.
Final Outcome #
After all of these previous steps are finished, your scheduled posts of WordPress will be automatically shared on your Facebook account when they go live. This is how it will appear on your Facebook account:
By using SchedulePress, this is how you can instantly share scheduled posts from your WordPress site to your Facebook page, or the group has now become absolute ease.
Getting Stuck? Feel free to contact our Dedicated Support Team for any further assistance.


