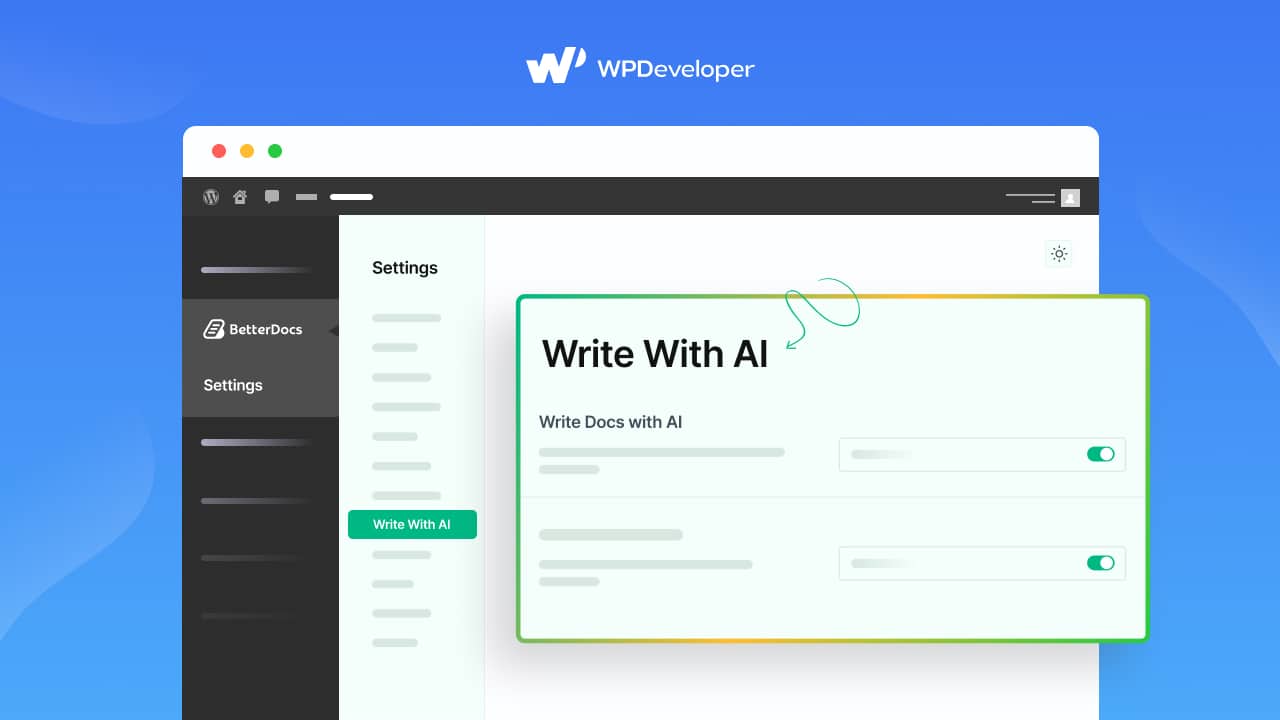
Elementor Essential Addon currently has 30 top-end elements in its library. With version 2.4.0, released in the mid-November of 2017, we saw the inclusion of two widgets along with other functionality improvements. You can check the Changelog to see what you are missing out. But for the time being lets focus on the newest addition to the Creative Elements bundle of Elementor Essential Addons- Content Timeline.

What can you do with Content Timeline?
Content Timeline for Elementor
The basic purpose of this element is to display pages/posts vertically. You can select how you wish to arrange these posts along the timeline. You have a dozen sorting criteria like- Date, Post ID, Post Author and so on. And it goes without saying, that you get the same customization options as any other Elementor element.
Getting Started
You can achieve more with this element than you think
When using this element,the first choice you would have to make is selecting a content source for the element. You can either pick Dynamic or Custom content source. Afterwards, according to the content source you have picked, the element will display customization options.

Using Dynamic Content Source
Display a Blog Series
The Timeline lets you display your blogs vertically. Naturally the length of your timeline is a great concern. It should not be too long that it kills the vibe. Thus, you must ensure a moderate length. There are many effective ways of addressing a blog topic. You can write one single blog post including all the related ones. On the contrary you can also build sequential blog posts addressing related topics separately. In case you are trying to implement the later method, the Content Timeline element can come very handy.
Place the more basic blogs at one end of the Content timeline. Then keep adding blogs according to their required level of understanding. This way, as your readers progress through the timeline they will know the farther away they are from the starting point, the more advanced the blogs will get.
Another way can be to order the blogs as they are meant to be approached. Staring with the fundamentals and progressing to the more advanced discussions.
Required Fields
The cards that you see along the timeline has basically three fields. The title, excerpt and a date. The element will fetch the excerpt from your website automatically. However you can manually set the limit to the number of words you want to display in the Excerpt field.
Getting the element to locate the kind of blogs you want to include in your timeline is very simple. You can sort the blogs according to a certain category. You can then add another layer of sorting by using the Order By option. You can pick to order the blogs by Post ID, Post Author, Comment Count, Title or Date. That’s not it. You can further add another layer to the sorting process by either placing the blogs in a descending or ascending order.
Lets look at an example
Blog Series-Building a WordPress Website from Home
A Quick Hack
So here goes a quick hack for you, you can always use the Custom Content Source option to create random cards for the timeline,and then insert links to the original blogs. Scroll up and see the timeline above. Suppose you deice to insert this timeline on your website. The first card has the title “Registering a Domain Name for Your Website”. But it’s not mandatory to have such a blog on your website. Maybe you have an old blog named- “The basic of Registering Domain Name” on your website. As the topics are closely similar, you can insert the link of your old blog “The basic of Registering Domain Name” in the first card “Registering a Domain Name for Your Website”. In one sense you are getting chances to use your best two title ideas for one blog.
Using Custom Content Source
Lets look at an example
In the above example, the timeline blocks has been used to display the sequence of a hypothetical WordPress Summit. As the readers scroll down they can see the Timeline light-up in green. This subliminally tells the readers that they are progressing through the line and at one point it would come to an end. This gives you an idea of how the Content Timeline can be used to graphically display the proceedings of an event. That’s just one example.
Lets focus on the hypothetical WordPress summit again. You can see that there is a button below every timeline block. You can actually assign links to these buttons to help readers who would seek additional information about the hypothetical WordPress event. These links would take the reader to other pages on your website containing the sought information. For example you can upload your Event Promo video on Youtube and then assign the link to the first card button.
What Other Creative Elements can be used to complement the Content Timeline
Lorem ipsum dolor sit amet, consectetur adipiscing elit. Ut elit tellus, luctus nec ullamcorper mattis, pulvinar dapibus leo.
Lets look at the hypothetical WordPress Event once again. What else can be done to complement the Content Timeline? The Countdown element is a perfect match. Every event has certain deadlines. The most common one that everyone is familiar with is the Registration Deadline. Have you ever forgotten to register for an event that you were so excited to attend? We all have! But then again as an organizer what can you do to prevent this from happening? Simple, send your candidates reminders. You may feel limited as there are not many creative ways to remind participants without coming out as too desperate. But lets look at the gif below.

You can see that the Countdown element perfectly complements the Content Timeline element.
Styling Options


Wrapping up
The Content Timeline comes with simple customization options that anyone can master overnight. This new addition to the Creative Elements Bundle lets you build the perfect timeline for your content. Let us know in the comment section what are the other creative ways Content Timeline can be used for.
Will You Recommend Our Plugin To Your Friends?


2 thoughts on “Create Amazing Content Timeline in WordPress Using Elementor”
Can I upload pictures instead of posts/pages?
Yes ofcourse,